

This is a quick guide on what you can do to set everything up just how you like it in ePractice. Some of these settings may not be available to you, either because of the plan you’re on or your allowed privileges. There’s also an overview of the dashboard, which allows you to jump straight to those important sections.
When you’re ready to update your settings, just click the Settings icon in the left-hand menu to see all the options.

Looking for help? You’ll find everything here – read through it all, or use the index below to jump straight to what you need.
Practice settings
Appointment settings
User settings
Site information
This will be pre-populated with your site name, address and ID and the name of the designated payee provider used for payment of electronic invoices from payors.
You can also upload a logo by either clicking Browse to find the file on your computer or you can drag and drop it into the box. Click Save.
General settings
- Public holidays* – this is a mandatory field, use the drop-down options to choose the region where your site is based to block out national public holidays
- Check for duplicates when saving patients – toggle this on so the system will alert you if you’re adding a patient with the same first and last name as an existing one
- Patient busy notification to user – toggle this on so you’re alerted when previewing a patient’s record if they’re in an appointment or having a procedure
- Prompt to add appointment after complete – toggle on if you’d like the system to prompt you to add follow-up or other appointments for a patient once the current one has been marked as complete
Patient indentifier types
These are mainly used and managed by medical secretarial sites that look after multiple practitioners, so they can ensure any info related to a patient is associated with the right practice.
You can set one of the system identifiers as the default and set the prefix and/or current value or you can create your own identifier(s) by clicking Add. Give your identifier a name, toggle on to set is as the default for your site and then toggle on system generate to set a prefix if required and/or set the current value. Click Save. Any new patient added will then start from the next available number. Note: you can only use one type of identifier at a time.
Task settings
This is where you choose what type of tasks you want to see. Perhaps you only deal with admin issues, so only toggle on the admin types, but if you’re a practitioner the clinical tasks will be much more important. Defining what shows up for you keeps the list clean and easy to manage. You can always make changes later. Choose from the following then click Save:
- Admin
- Arrange follow-up
- Chase money due
- Credit control
- Diagnosis query
- Invoice
- Medication query
- Patient query
- Personal
- Phone call
- Reminders
- Test result query
Insurer
This section is for reference only as our systems will complete this automatically based on insurer/payor responses. You’ll see the full list of insurers/payors using our systems and the status column gives you an indication of whether the practice is recognised or not. The Number column shows the provider number associated with that insurer/payor for the site.
If you want, you can toggle to only show those insurers/payors that recognise your site and you can search for a specific insurer rather than scroll down the list.
Practice hours
This is where you set when you’re available to see patients. You won’t be adding locations at this stage, simply the days of the week and your working times.
- Toggle on the days of the week that want set – as you do this, the start and finish times for that day will appear
- Add a start and finish time for each by either clicking on the hour and minute sections, or the clock icons in the start and end boxes. You can add multiple start and finish times by clicking + Add More e.g. a morning session from 08:30 to 11:00, an afternoon session from 14:00 to 16:00 and an evening session from 18:30 to 20:00

These values will become your Working week.
Appointment types
Here’s where you create and manage the different types of appointments used when booking patients into your diary. These are based on the Industry Standard Codes (ISCs) that are used in the background to identify what type of appointment is being invoiced to insurers. You can call your appointments whatever you want and have multiple versions of the same thing, although remember the name must be something that’ll be understood by anyone.
The list is in alphabetical order but to help you find the right one quickly, simply type part of the Appointment name in the search box.
To give you a head start, we’ve included 18 commonly used appointment types, with suggested durations – we’ve kept the name the same as the ISC. These are:
- Anaesthesia For Surgery – 360 mins
- Consultation with Minor Treatment – 60 mins
- Consultation, Follow up – 60 mins
- Consultation, Initial – 60 mins
- Consultation, Outpatient – 60 mins
- Initial telephone consultation with MSK Specialist – 60 mins
- Inpatient Consultation – 60 mins
- Physio O/P Consultation per 15 Minutes – 15 mins
- Physiotherapy Follow-up Remote Consultation – 60 mins
- Physiotherapy Initial Consultation – 60 mins
- Physiotherapy Initial Remote Consultation – 60 mins
- Physiotherapy, Follow Up Consultation – 60 mins
- Remote Consultation – 60 mins
- Surgeons Fee for Surgery – 360 mins
- Telephone Consultation over 15 Minutes – 15 mins
- Telephone Consultation up to 15 Minutes – 15 mins
- Video Consultation over 15 Minutes – 30 mins
- Video Consultation up to 15 Minutes – 15 mins
You can easily delete those you don’t want and edit the ones that you’ll use by following these simple steps. NOTE: You mustn’t use an appointment type that’s aligned to a specific professional ISC for another e.g. don’t use Physiotherapy Initial Consultation if you’re not a physiotherapist.
Editing or deleting an appointment type
At the top of the page underneath Appointment types you’ll see the pre-loaded list. To delete an appointment type simply click the three dots at the end of the relevant row, click Delete and then click Yes. Once deleted it can’t be reinstated and will need to be added again.
To edit an appointment type click the three dots and then Edit.
- You can change the name in the Appointment type name (alias) box to anything you want
- Change the colour by clicking in the box and choosing an alternative
- Change the duration by highlighting the number and overwriting with the new value or use the up and down arrows that appear in the right-hand side of the box when you hover over it
- Click the Treatment setting box to choose the correct setting
- If you think you may want to use this appointment type in the future but want to remove it from your list for now, tick the inactive box – to include your inactive appointment types when you’re looking at your list just tick the Include inactive box and the top of the screen. Untick the box if you want to re-activate it
- Click Save
Adding a new appointment type
- Click Add
- Click the Appointment type box and type in the type of appointment you’re looking for e.g. consultation, physio or therapy and choose the relevant one from the list – you can try and narrow down the search by typing in more specific words
- The same name will show in the Appointment type name (alias) box but you can overwrite this to your own e.g. Consultation, Initial(E0000610) can be renamed Initial appointment (45 mins)
- You can choose a colour – an initial colour will be shown but you can change this by clicking in the box and choosing from the available options
- The Duration defaults to 30 minutes – you can change this by either highlighting 30 and overwriting with the new value or click in the box and use the mouse wheel to scroll up or down
- When you click the Treatment setting box you’ll be given a list to choose from – you can only have one setting per appointment type, so add another one for a different setting as required
- Click Save to add to your list
- You can make changes to this appointment type at any time by clicking the three dots, Edit and following the instructions for Editing or deleting an appointment type
- If you’ve never used an appointment type you can delete it by clicking the dustbin icon
Visit status
This is where you can set the different stages of a patient’s journey from booking the appointment to invoicing and everything in between. They can be tailored to match your workflow, reflecting how the team manages and tracks patient visits. Think about the areas you’d like to track before making any changes, although you can add, delete or refine at any stage.
- Click into each stage (there will be 8 available) and type in what you’d like to call it
- Delete any unused stages using the dustbin icon or click Add stage to add another one
- You can add an SLA if required – this is currently only available in days
Appointment instructions
These are helpful notes or guidance that you can send to your patients, maybe helping them to prepare for an upcoming appointment (e.g. fasting instructions or details of what they need to bring) or giving them directions to find you.
- Click Add
- Give your instruction a name that’ll make it easy for you to know what it’s about and add the relevant text – you have 500 characters, so keep it short
- If it’s for giving directions, toggle on the Location direction button
- Click Save
To edit or delete an instruction, click the three dots at the end of the line and click Edit or Delete. Clicking edit will allow you change everything, including toggling off the Active button so it won’t be available to send but will still remain in your database for future use.
Appointment status colours
Having all your appointment statuses colour-coded helps you stay organised, making it quick and easy to see what’s going on with your patients at a glance.
These are the available statuses:
- Arrived
- Cancelled
- Complete
- Confirmed
- DNA
- In Progress
- Seen
A colour will already be associated with each status. If you’d like a different one, simply click the colour wheel next to the one you want to change.
You can either pick one of the colours on the left-hand side or, if you want to choose something different, simply click on the colour box on the right to open the colour picker. The current colour is also shown in the circle – any changes you make will be automatically updated, so you get a quick visual confirmation before updating. There are a few options available to get the colour you want:
- Use the saturation and brightness panel at the top – dragging the circle refines the intensity and lightness of the colour
- Click the eyedropper tool, hover over the colour of your choice (maybe from your own website) and then click to choose
- Move the hue slider (the horizontal rainbow bar) left or right to change the base colour family
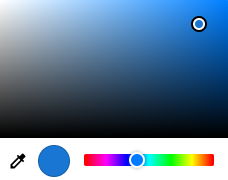
- To input exact colour values you can overwrite the current value using RGB (numerical values for red, green and blue) or click the arrows at the side to scroll to HSL (numerical values for hue, saturation and lightness) or Hex (a compact way of writing RGB values)
- Click outside the colour picker to close it – click Reset if you want to go back to the original or click Add if you want to use it
- The update will now be shown in the New colour column – click Save
User settings
This is where you set your default views of the diary and dashboard.
- Click the downward arrow on Diary default view and choose from one of the following:
- Day
- Month
- Week
- Work week
- Agenda
- Click the downward arrow on Dashboard tab selection and choose from one of the following:
- Patient
- Appointment
- Click Save
Patient tab settings
These settings control what tabs you see when you view a patient’s record. You can update your selection at any time, either here or directly from the record, depending on your access permissions.
- Change the order of the tabs by clicking on the tab name and dragging it up or down the list
- Toggle each tab on or off to add or remove it from view
- Click Save
Contact types
In addition to the available system contact types, you can create as many of your own custom ones to help you categorise and organise your contact info how you like it. Contact types are used when adding any new contact to your database.
- Click Add
- Type in whatever you want to use e.g. brother, father, HR manager etc and click Add
This’ll now be added to your list. To edit or delete a custom contact type, which are listed as User defined, hover over the one you want and either click the pencil icon to edit it or the dustbin icon to delete it. You won’t be able to edit or delete any System types.
Dashboard
As soon as you login to ePractice you’ll land on the dashboard and you can do most things straight from here, rather than jump to different sections. Set out in a grid, this gives you quick access to the following areas:
- Patient list/booked appointments – access your patients and view all appointments
- Invoicing – see you r invoices and outstanding balances
- Quick book – quickly add an appointment to your schedule
- Open tasks
- Documents
- Availability of your resources today
The first three are at the top of the page and you can access the others by clicking on the relevant link in the bar found at the bottom of the screen.
You can also quickly add a patient, create an invoice, add an appointment and add a task by clicking one of the tiles at the top of the Dashboard.

Patient list/Appointments
The default to show either your patients or appointments when landing on the dashboard is set under User settings.
Clicking on Patients gives you a list of all of them and you also have quick access to anyone on the waiting list or anyone you’ve recently accessed. Search for patients using their demographics e.g. Last name, mobile number etc and filter by visit status. You can also include inactive and deceased patients by using the filter. Clicking the arrow at the end will expand this section to fill the screen – clicking it again will snap it back into place.

More details about how to access your patients from this section is found in the Editing basic patient details section of our guide to Electronic Patient Records.
Click on Appointments. The default is to show you all appointments that have been booked for today for the resource shown in the box at the top of the page. If you’re a clinic and have more than one resource set up you can change this by using the drop-down menu.
Clicking the three dots at the end of the appointment row gives you the following options:
- Reschedule
- Reassign – only available for clinics, allowing you to easily move a patient from one practitioner to another
- Create invoice
- Update status
- Delete appointment
Invoicing
This is the option on the top right of the Patients/Appointments section and gives you a snapshot of the total amount outstanding and the sums and percentages of that amount by aged debt bands. Clicking on the expand icon in the top right will take you to the Accounts section, where you can see all your invoices.
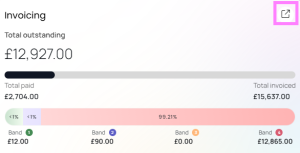
Clicking on a coloured section of aged debt bar, will take you directory to the Payors screen showing you the individual invoices that make up the total in that band. Check out our guide for more info on Accounts.
Quick book
Found on the bottom right-hand side of Patient list/Appointments, this allows you to quickly add an appointment to a session without navigating to the diary. If you’re a clinic you first need to choose the right resource from the drop-down options. If you’ve set up your sessions already, all you need to do is click a slot and take it from there.
If you haven’t set up your sessions yet, you can quickly create one by clicking the link. More info on what’s required can be found here.
Open tasks
This shows you all the open tasks assigned to anyone in the practice of the type(s) you have chosen to see within the task settings. You can edit and delete tasks from here. To only show those assigned to you, just toggle on Show my tasks.
Documents
This section gives you quick links to all the areas you’ll need at your fingertips – simply click the icon next to each of them.
- Documents queue – allows you to manage any documents in your processing queue
- Reprint – allows you to reprint or regenerate any previously processed document
- Generate batch – click the button on the top right-hand side to open the tile and generate receipts, shortfall and reminder letters
- Correspondence templates – allows you to edit or add any accounting or other templates, headers or footers
Today’s resource schedule
Especially useful for a busy clinic, you can see at a glance all the resources that are set up for your site and their availability “today”. The options will be Unavailable or Available – if available you’ll also see the session times.

For further help check out our Healthcode Academy which offers 1-2-1 online training – discover what modules are available. You can also get in touch with one of our friendly team.